#5 Table It!
Use tables to present data and be sure to label the rows and columns, so users can understand and navigate the table. Screen readers identify tables to readers and indicate the number of rows and columns, so be sure to label them properly.
| Name | Age | Birthday |
|---|---|---|
| Becky | 14 | March 4 |
| Bob | 45 | August 2 |
Tables should not be used for layout purposes (to place images and text). If you don’t have headers for your table rows and columns, you probably shouldn’t be using a table.
NOT APPROPRIATE USE OF TABLE
Screen readers won’t make sense of this data and it will become confusing for students.
| 1 – Read pages 45-53 in Defending the Master Race |
2 – If you don’t have a personalized copy, you can buy one here: https://www.amazon.com/Defending-Master-Race-Conservation-Eugenics/dp/1584657154 |
3-  |
|---|---|---|
| 4 – Write 5 page paper on Fake News. Use multiple citations to defend your stance. | 5 –  |
|
| 6 – Post to the discussion forum and post to two other student’s posts. Make sure you are making a coherent statement. |
7 – Read the Moodle Book on Fake News and watch the two videos posted for this week. | |
You should avoid using spaces, line breaks, or tabs as a way to create the illusion of tables.
PRETENDING TO MAKE A TABLE, but not.
NAME YEAR MAJOR
Melanie Freshman History
George Junior Communications
Amy Senior Education
TABLES
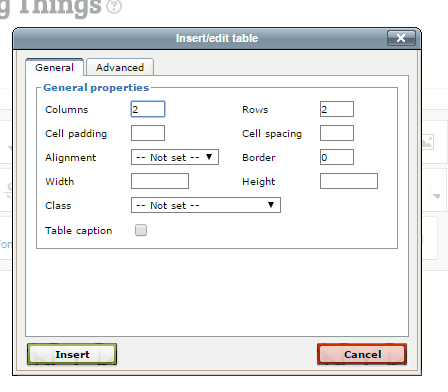
To add a table, use the following steps.
Open your Moodle course.
Turn Editing on.
Anytime you have the opportunity to add text to Moodle – think weekly summaries, labels, assignments and discussion forms – you should have ability to add a table.
Locate the bar tool bar, just above your text. It should have one row of icons.
Click the very first icon to expand the tool bar giving you access to the Table icon.

In the pop up box, identify how many Columns and Rows you would like in your table (You can always adjust later.) Press Insert.